So its Jan 2nd, the weather is typically British and 10ºC, yes that's right a mid winter 10ºC. One of my bushcraft chums is determined to boost my spirits and is dragging me out for the night. With very little notice to get sorted, I've thrown the winter kit into the bergen (mistake 1, but we'll get to that). Met up with my chum and just before last light we start yomping up the hill to my permission and a little camp I've been making. This was his first time up there and a good year since I'd camped out there.
I'm very lucky that my inlaws have a little 2 acre woodland near Gatwick, albeit a little public with a footpath running through it and some over zealous neigbours who consider anyone up there terrorists. We've had armed police called on us whilst holding a work party with 3 chainsaws running all day! But that's another story for another day.

The shelter part constructed taken a couple of years back. The roof is on now.
So, with failing light, we started to rig up our hammocks and tarps and with that done, on to the fire. Laying down a bed of sticks to protect the fire from the damp ground, I started to build a nest of tinder and splitting some dry wood to make the kindling. A selection of feather sticks and dry twigs were now at the ready. With some thicker dry wood ready to go too, out came the fire steel and cotton wool with vasoline. Poised and ready, I pulled back on the steel and was instantly blinded by the sparks (mistake 2). Having completely missed the cotton wool, I tried again, this time with success. Slowly I built up the rather modest fire and finally, as it was taking hold, I sat back to let it slowly build (mistake 3). Now my chum took over tending the fire and within a minute or two, it was dead. It's funny how he manages to do it, he's far more experienced at these things than me, I think he's just having a run of bad luck. But it does prove it happens to even the best of us. Now was crunch time, we needed a fire before we starved or froze to death (massive exaggeration 1).
We decided to take a different approach, one that had got us out of trouble on a previous meet where our fire turned out to be in the way of a newly formed stream from all the rain running off our parachute. It was time for the alter fire. those that don't know this, I'll explain how we built ours.
We take a base of green sticks, about 50mm thick. Then take some more, but this time split, and laid at 90º to the base ones. That's with the split side up. We then do it several times more again each layer at 90º to the previous layer. Now we build the fire on top of this alter as normal. This proved to be very successful and we had a right blazing fire going in quite short order.

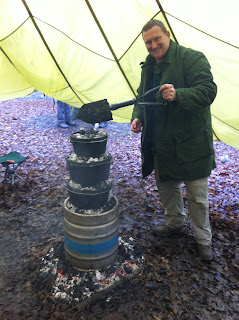
Our fire blazing bright
Having spent some time building the camp, I've got some bits ready prepared, such as the pot hanger tripod and a bushcraft sawhorse, which were put to good use. Not to mention the much diminished wood pile.
The evening was whiled away cooking up some good grub and chatting sat round a roaring fire on the most unseasonably warm evening. Finally retiring to my hammock, I struck upon a small problem. Having taken my winter sleeping system (Snugpak Special Forces 2 system). It's a 2 bag system and has a baffle device holding it all together, well I managed to get in between the 2 bags, not a situation easily resolved once in a hammock. Once sorted though, I settled down to a good nights sleep, or so I thought. It turned out that the local nightlife had other ideas. It seemed that every owl in the local area had decided to chilax over head and were quite vocal about it.
So morning came and the night was OK as it goes, felt good to start the year off with such a chilled night.
lessons learned:
Mistake 1 - winter sleep kit. It was 10ºC over night, so no real need for kit that goes to -25ºC
Mistake 2 - a modern fire steel produces very hot, bright sparks. So if it's dark, close your eyes.
Mistake 3 - getting fire prep wrong. Build a good base and twice as much tinder and kindling as you think you need
massive exaggeration 1 - OK, with the kit on me I really didn't need a fire, I had a stove and gas for cooking and a sleeping bag more than capable of keeping me warm.


