Monday 6 May 2013

I'm a fire starter, twisted fire starter.

It's no secret I've had varied success with the bow drill fire lighting method. I have had some good results with prepared sets, but lots of trouble with strings. Then, at one of the Sussex group meets, we went for a set foraged on the day.

Well that didn't quite work out either. So on to another meet and this time, still using the hearth from the foraged and a home foraged hazel drill, I got an ember, which sadly I failed to blow to flame.

Now forward fast to the bank holiday. I've worked out what tension I need on the string. The hearth is proven, but not seasoned yet and I'd cut a new drill from a piece of green ash at home.

Photobucket Pictures, Images and Photos

Now, time to get bowing. In the past this has involved a lot of exhausting bowing, often resulting in the ember being extinguished by sweat. But today was a break through day. In next to no time I had smoke a plenty. I thought this can't be true, but yes, I had an ember. I was so not expecting that, that I didn't even have my camera ready. After a short sprint round the house I found it and got this

Photobucket Pictures, Images and Photos

sadly I was even less prepared and didn't have any tinder. After another sprint round, I found something, but sadly no flame. No problem, I'll get another in a couple of minutes I thought. Well I never expected that to be an over estimate! A quick retention on the string (I am learning), and a few good strokes, another ember. Tinder bundle ready, a little bit of blowing and I had this.

Photobucket Pictures, Images and Photos

oh, and a very big grin on my face.

Monday 4 March 2013

Year of Bushcraft 2 Camping in the snow

As January 2013 slowly moved towards February it finally happened. The weathermen said it would, the sky looked like it would, the barometer showed it would and it did. Snow! And this wasn't just southern softy snow, this was proper snow. And by a quirk of fate it was the same weekend as the Sussex bushcraft UK meet at Broadstone Warren. So armed with my kit and a Land Rover, off I went, not really sure what I had let myself in for.

It was in the air as I left home on the Friday morning and by the time I'd reached the motorway cars were already only doing 15 mph. Full of enthusiasm I pushed the Land Rover pasted, with a little curse at them, it's not even laying yet!

By the time I reached Broadstone, there was a good 50mm on the ground and it was falling heavily. Being the first one there I was able to enjoy the crisp virgin blanket of white that covered both the beautiful and ugly of a winter woodland. No fire scars on the ground or visible litter, not even tracks from animals (yet). All road sounds were suppressed and the wood just felt peaceful and still.

Virgin snow at Broadstone


But time was pressing and if I was to get set up before the light went, I needed to crack on. As I had the group shelter too, I decided to rig my own tarp first and string the hammock before the parachute and then go back to my camp and sort my sleeping kit. Now a 3m x 3m tarp wasn't going to cut it as it barely covers the hammock anyway and with the small amount of breeze it was going to be blowing in. So being a bit Heath-Robbinson, I added a small extension to my rig. This was a small tarp, but between the two of them I could close off the ends nicely to keep me snug at night. I also struck upon the idea of popping together the press studs on the smaller tarp to form a bit of a tunnel for the leg end of my hammock to go into. It wasn't a pretty set up, in fact it got nicknamed the 'shanty town' by the others, but it was set.

My Shanty Town


Now onto the group parachute, this is normally at least a two man job, but I though the sooner I get it up, the sooner I can sit under it!

So pulling out the new rope that had been donated to us, I hoisted up the chute and tensioned it off as best I could. By now some of the others had started to arrive and three of us finished putting it up, well we thought we had...

A not so well hung chute


By now it was snowing quite hard and there was a good 100mm of the white stuff and it was still coming. We started to settle down for the evening and had a bit of a fire going. It was then we realised that we'd pegged the chute out too close to the ground and had trapped all the smoke in. It then became a bit of a frantic trying to get the chute up higher, as the snow accumulated on it, and deal with the it over a lit fire. Enough was enough and we decided to re-rig the chute with the old ropes as the new one was more elastic than rope. With things set at a better height and angle, we settled back down round the fire and I started to dry myself out. It's funny that you don't notice how wet you are getting when you are working in the snow until you stop. With the snow still coming down hard and the occasional run round to knock off the snow that was gathering on the chute, things were settled down to the usual banter round the fire. Mind you, I did have to get my shoes and socks off to try and dry them out round the fire, which caused a bit of hilarity. 

And so it came time to turn in, a well rehearsed routine now for getting into the hammock, but first a final check on the digital thermometer to see that we'd already dipped to -2°C under the tarp. Knocking off the accumulated snow from the tarp I settled down for a good nights sleep.

Morning came all too quickly and my internal alarm clock woke me up with the usual urge to pee. This meant getting out of my lovely warm sleeping bag. But needs must and with an increasing sense of urgency I got up. Having checked the overnight low for under my tarp (-4°C), I broke the ice off of the outside of my sleeping bag. Now to the business of bushcraft, well, what we call bushcraft. This involves a leisurely breakfast after first man up has got the fire going (so that wasn't me then). This was followed by a group firewood expedition and mass processing. Expecting more latecomers that afternoon, we had a fairly large pile of wood ready to go. All of this had taken some time, what with the brews, lunch and chats, but we certainly were not going cold that night!

About a third of what we collected for Saturday night


A few of us had got together to make a stew. One chap had brought along a haunch of venison to which we added beef, vegetables, stock and dumplings. This took about 3 hours with prep and cooking. And again the Dutch oven was put to good use. Come the evening we all settled down for a feast of stew followed by a roaring fire and even more banter. The wind had picked up through the day and the snow had barely stopped to notice. Turning in for the night I knew it was going to be colder, but my setup didn't let me down and even though it got down to -6°C under my tarp, I was toasty warm again.

A stew in the making. this is just the meat browning!


And so to sit back and watch the stew, well, stew!


Sunday morning came and everything was still very white. It looked like I'd had visitors in the night judging by the tracks round my camp (deer mainly) and with a hearty breakfast inside me, I thought it would be best to get packed away and on the road so that I could get home and get sorted. The others agreed with me, and we broke down the camp. Now I've never put the chute away snowy before, but I can tell you it gets very heavy!

Heading off at lunchtime, I was proven right that I should head off early as there was an accident directly outside the campsite and another up the road. Using all of my considerable 4x4 experience and spacial awareness (if you've ever seen me drive, you'd be rolling around on the floor laughing now) I performed a 47 point turn in the road and headed home.

Lesson learned

1. Looks aren't everything. My setup may have looked like a shanty town, but the tunnel tarp for my legs really did the job and I'm sure it saved me from a chilly night.

2. Moisture management is key in the snow. If you sweat you are going to get cold.

3. Snow isn't wet until it defrosts. Working when it's snowing, you don't notice the snow on you. But if you are out in it for too long, you get damp.

4. Moisture management is key in the snow. If you get wet, you get cold. (I know I've said it before, but it really is that important)

5. I've said it before, but a group working together collecting and processing wood leads to a toasty warm night round the fire.

6. Group meals make sense. Shared cost, labour and less cooking pots round the fire.


Sunday 6 January 2013

2013 - my year of bushcraft no. 1


Now 2012 was a bit of a roller-coaster of a year finishing on a bit of a low, but 2013 is going to be the year I really get some serious bushcraft under my belt.

So its Jan 2nd, the weather is typically British and 10ºC, yes that's right a mid winter 10ºC. One of my bushcraft chums is determined to boost my spirits and is dragging me out for the night. With very little notice to get sorted, I've thrown the winter kit into the bergen (mistake 1, but we'll get to that). Met up with my chum and just before last light we start yomping up the hill to my permission and a little camp I've been making. This was his first time up there and a good year since I'd camped out there.

I'm very lucky that my inlaws have a little 2 acre woodland near Gatwick, albeit a little public with a footpath running through it and some over zealous neigbours who consider anyone up there terrorists. We've had armed police called on us whilst holding a work party with 3 chainsaws running all day! But that's another story for another day.


The shelter part constructed taken a couple of years back. The roof is on now.

So, with failing light, we started to rig up our hammocks and tarps and with that done, on to the fire. Laying down a bed of sticks to protect the fire from the damp ground, I started to build a nest of tinder and splitting some dry wood to make the kindling. A selection of feather sticks and dry twigs were now at the ready. With some thicker dry wood ready to go too, out came the fire steel and cotton wool with vasoline. Poised and ready, I pulled back on the steel and was instantly blinded by the sparks (mistake 2). Having completely missed the cotton wool, I tried again, this time with success. Slowly I built up the rather modest fire and finally, as it was taking hold, I sat back to let it slowly build (mistake 3). Now my chum took over tending the fire and within a minute or two, it was dead. It's funny how he manages to do it, he's far more experienced at these things than me, I think he's just having a run of bad luck. But it does prove it happens to even the best of us. Now was crunch time, we needed a fire before we starved or froze to death (massive exaggeration 1).

We decided to take a different approach, one that had got us out of trouble on a previous meet where our fire turned out to be in the way of a newly formed stream from all the rain running off our parachute. It was time for the alter fire. those that don't know this, I'll explain how we built ours.

We take a base of green sticks, about 50mm thick. Then take some more, but this time split, and laid at 90º to the base ones. That's with the split side up. We then do it several times more again each layer at 90º to the previous layer. Now we build the fire on top of this alter as normal. This proved to be very successful and we had a right blazing fire going in quite short order.

Our fire blazing bright

Having spent some time building the camp, I've got some bits ready prepared, such as the pot hanger tripod and a bushcraft sawhorse, which were put to good use. Not to mention the much diminished wood pile.

The evening was whiled away cooking up some good grub and chatting sat round a roaring fire on the most unseasonably warm evening. Finally retiring to my hammock, I struck upon a small problem. Having taken my winter sleeping system (Snugpak Special Forces 2 system). It's a 2 bag system and has a baffle device holding it all together, well I managed to get in between the 2 bags, not a situation easily resolved once in a hammock. Once sorted though, I settled down to a good nights sleep, or so I thought. It turned out that the local nightlife had other ideas. It seemed that every owl in the local area had decided to chilax over head and were quite vocal about it.

So morning came and the night was OK as it goes, felt good to start the year off with such a chilled night.

lessons learned:

Mistake 1 - winter sleep kit. It was 10ºC over night, so no real need for kit that goes to -25ºC

Mistake 2 - a modern fire steel produces very hot, bright sparks. So if it's dark, close your eyes.

Mistake 3 - getting fire prep wrong. Build a good base and twice as much tinder and kindling as you think you need

massive exaggeration 1 - OK, with the kit on me I really didn't need a fire, I had a stove and gas for cooking and a sleeping bag more than capable of keeping me warm.


Christmas dinner in the Woods

"Jingle bells, jingle bells, jingle all the way.
Oh what fun it is to cook in a barrel off a dray"

Have you ever found the internet to be a dangerous thing? All that information, videos and crazy ideas just waiting for someone to look at them. Well someone from the Sussex Bushcraft UK group found one of these silly article on cooking a turkey in a trash can on an American site. It was floated round the group and a few people were up for it. Next thing you know, we've got a full menu planned.

Now as with all good ideas, we at the Sussex BCUK group like to put our own spin on things. Being quintessentially British, cooking in a trash can (or metal refuse receptacle as we call it in the home counties) was not our style. We needed to come up with something that was more British, more Sussex, more us. Then, one bright spark comes up with a beer barrel! Now that was us. Sadly he'd already emptied it, but now we had a plan and a method. So the date was set, the menu sorted and the venue, well where else would we be, Ashdown Forest.

For those of you not familiar with this method of cooking, I'll try and explain.

1. Take a beer barrel and empty it. How you empty it is up to you, but if you do it by yourself might I suggest leaving step 2 for a few days.

2. Cut out the top of the barrel and clean/sterilise the inside. Being a beer barrel it will already be a food grade material, so nothing to worry about when putting food in it.

3. Take some tin foil and place it on the ground. Wrap a couple of bricks in tin foil and a stick, again wrapped in tin foil. place stick in the ground, bricks at the base.

4. Take a defrosted turkey with all the bits removed and place on stick.

5. Place empty, topless beer barrel over turkey

6. Place some lit charcoal round the base and on top of the beer barrel. For those a little more familiar with beer barrels will know that with the base inverted you are left with a nice recess to hold your charcoal.

You know what, pictures say it better...


The prep done and the barrel ready


Charcoal lit and spread round, the magic wafter is put to use as the
coals really start to heat up


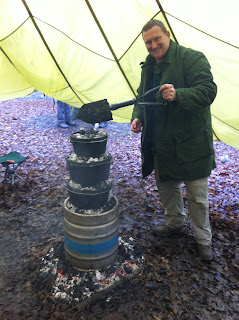
The Christmas meal tower. Note the clever use of charcoal
on top of each pot to act as the base for the next.

From top to bottom
Sausages in bacon
Christmas Pud steaming
Roast Potatoes
Turkey in a Barrel


And not to forget all the veggies and stuffing balls cooking on the very well built fire.


Keeping an eye on things, roast potatoes doing well and a turkey bronzing up a treat.


One happy head chef. Our steady hand on the tiller and driving force.


Leading to one group of happy campers. A big thank you to one and all as this was a true group effort. From the planing and wood gathering to everyone pitching in with the cooking just made it all taste better.

So in conclusion, this was a great way to cook and the perfect start to Christmas. If anyone is thinking about giving this a go, I recommend it. We had a 10kg turkey that took about 2 hours to cook and well checked with a meat thermometer. Roasties were about an hour and the sausages and bacon only needed about 45 minutes.

I foresee this becoming a Christmas tradition for the Sussex BCUK group, which is no bad thing in my eyes. 

How many more sleeps till Christmas?


Sunday 9 December 2012

What to do with a Sunday

So you know how you just sit on the sofa on a Sunday thinking “I’ve got nothing to do today, I think I’ll just sit here and watch TV”. No? me neither. As an aspiring bushcrafter I find that there are 101 things that I want to do, make and learn. But the list never seems to get any shorter and other things in life always seem to get in the way. I’ve got so many part started projects my poor shed is bursting at the seams.

But a few months ago there was a break through. SWMBO was out for the day sheep dog trialing, the weather was too bad to do anything on the farm, the house was beyond tidying and only a day wouldn’t even make a dent in it and work had been very stressful. So it was decided that it was going to be a Man day!

Full of gusto, I marched down to the shed, head held high and flung open the doors. As I was hit by the tidal wave of junk and debris, my head sunk, what exactly was I going to do with little to no work space that could be achieved in a day. As I waded through everything, and trying to tidy as I went, I found the bow saw blades I had bought in preparation of a project I had wanted to do for some time. That was it, today I was going to build my own version of a buck saw.

Fighting through the array of tools and bits of metal I finally found my wood off cuts bin. Delving deep to find 3 suitable lengths of wood, I was set to go. But wait, how was I going to make this, was it going to be a quick and dirty, more function than form, or was it going to be something that I would look at and say, yes, that’s both useful and pleasing to the eye.

So back into the house I march and grab the computer. I’m sure there is someone on BCUK who has made one of these much better that I ever would. So now with a stolen design, back down the shed.

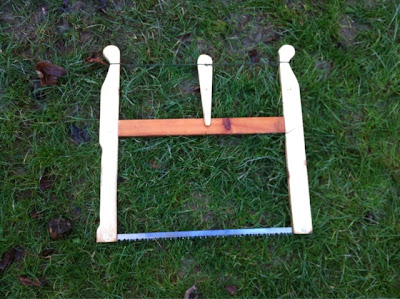
Pulling out the table saw, I set to work, cutting and measuring (yes, I did do it the wrong way round). Then a sudden flash or inspiration, what if I could make it so I could carry the blade within it and a spare. In fact my intension had always been to carry a green wood blade and a dry wood blade, so that I had options. And so, on the fly, my design was born.


I decided to put a slit running the length of the cross bar to house the blades when not in use, I also opted for scrolled tops to act as the tie-off point for more of an aesthetic touch than anything. The handle I crafted smaller and rounded for the comfort of my southern softy hands. It all locks together with a mortise and tenon joint and the blade fits in the slot and held in place with a couple of bolts and wing nuts. With the basic construction done, it was time for the finish, or in this case the Danish (oil that is).


It has been a fun little project to work on and a very practical one too. It’s been out with me on the last couple of Sussex BCUK meets and really proven its metal by getting through some big bits of wood. All in all a job well done and this is now a part of my regular bushcraft kit and packs down quite nicely.


all done, and well used.
Packs down nicely.

Tuesday 5 June 2012

Successful Bow Drill Ember

One of the key principles of Bushcraft, in my opinion, is the ability to light a fire. The truth is there are hundreds of ways to light a fire, some are really ingenious and simple, like a lighter or matches. Some are scientific like using potassium permanganate and glycerin or a ferro rod. Then there are primitive techniques like the hand drill or bamboo thong. But for me the benchmark is the ability to light a fire using the bow drill method.

Now I’ve been able to light fires using other methods for years now, my personal favourite is vaseline in cotton wool and sparks from a ferro rod, a very quick method to get a flame. Others have included the use of cramp ball fungus and a ferro rod and a feather stick. But one method has eluded me since I really became serious about Bushcraft, and that’s the bow drill. Now I’ve read up on this and there seems to be a variety of techniques and woods that you should use. Which in its self can be quite confusing and daunting. Not being a big fan of reading to learn, I’d rather learn through experience, I was lucky enough to do a course with Paul Kirtley a month or so ago where he produced a bow drill set whilst we were on a walk in what only can be described as biblical weather. Well as you would expect he made it look devilishly simple, so simple in fact that he even managed to get me to make an ember and light some tinder, with a little help. In fact I’d never considered that it could be a 2 person job, so much easier!

But since then it’s been bugging me that I couldn’t quite manage it on my own. No reflection on Paul by the way, in fact if it wasn’t for what he taught me, I still wouldn’t have got to where I am today. So now armed with some practical techniques, a better understanding of what I’m doing and some of the factors that held me back, I set off to achieve a solo ember.

Now one thing I’ve learnt in not just Bushcraft, but many facets of life, is that you have to have the common sense to adapt to your environment and physical (dis)abilites. It’s no secret that I’m a little on the heavy side but add in asthmatic and generally broken from over 30 years of pushing my body beyond normal limits and breaking points, I have a few physical restrictions. So taking what I’ve learnt from Paul, the advice from other great Bushcrafters like Kepis from BCUK, the long Jubilee Bank Holiday was going to be the weekend I’d master the bow drill.

Now some would say seasoning your hearth beforehand is cheating, but I like to call it preparation. Having cut up a well seasoned poplar for charcoal burning, I kept a piece to one side and planked it to use for future bow drilling. Next piece of the puzzle was the string. String is something that I am not short of, so a bit of cord was stashed in my pocket. As for the bow, I’ve been playing with the bow drill for years and have had the same bow from day one. I know it’s easy enough to find a bit of wood to suit, but why cut more wood than you need to. With that ethos in mind, I scavenged a length of hazel from the spoils of some bad pollarding by the electric company under some power lines that run through a local wood to me. My set was complete and a day in the woods began.

my first set in the woods
 I shaped my drill, carved a depression into my hearth and away I went. I made the drill longer to suit my physical impairment (a big fat belly) and things were going great. Then the string started to slip on my drill and cut through itself. Quickly swapped it for a new piece of paracord. Well it was obviously good as it started slipping too and cut the drill in half.

A minor set back, I thought, and grabbed another stick, trimmed and shaped it and off we went again. Sadly the new bit of string didn't last either, so home I came.


Discussing it with fellow Bushcrafters, Kepis made a couple of good observations. He usually cuts his drill to about the thickness of his thumb and also the wood looks a bit ‘punky’. Agreeing with him, I set out to cut myself a piece of hazel suitable for the job. As I didn’t have his thumb to hand, I went for something a little thicker than my own and matched the drill Paul had given me from our course.

Now tooled up and resorting to backyard bushcraft, as the weather wasn’t playing ball, I had another go. Still no success, so now to fall back onto common sense.

  1. Stop, look at what is actually happening
  2. Think, why is it happening
  3. Reflect, look back at what you were taught
  4. Change what you’re doing

I realised that my drill was polishing up and not making good contact with the hearth, so replaced the cord with a bit of 550 paracord, reshaped the drill, started a new hearth hole and made a new bearing block (had worn through the other). So pretty much started from scratch and not being able to spend too much time at it, I gave it one final blast and what do you know, it worked.

My first solo ember

So what have I learnt from this? Well, a good cord makes a difference, also getting the tension right makes life a lot easier, it didn't need to be as taut as I thought. For me, the drill needed to be longer than usual and a bit fatter than my thumb, also finding a rhythm that allows me to breathe made sure I could keep going at the vital time. Being out of breath also meant that was there was enough of a pause once the ember was smoking on its own to build up. So now I feel I can pop a tick against this one, next, well let's see if I can get the time of creating it down to less than three days.


My successful bow drill set


Special mentions to Paul Kirtley for showing me how
Kepis for reminding me

Monday 5 March 2012

Netting Needle Challenge

So there I was, just flicking through the Bushcraft UK forum, when I spot this Challenge thread. Having a read it would seem that the idea was you pop your name on a list and the next person to join would set you a challenge. This could be anything Bushcrafty, anything at all, which did worry me as my skill level is that of a toddler. But on the list I went and set a challenge for the guy above me, that was to carve a leaf from the wood of that tree. So an oak leaf from oak for example.

Quaking I waited for the PM to come through, what would it be. Forge my own knife, carve a wood spirit, light a fire with flint and steel. Then it came through, my personal challenge from a faceless person somewhere out there in cyber space. Someone who has never met me, seen my total lack of technical ability or tool handling skills. there it was, carve a netting needle.

A netting needle, What on earth is that? I thought. Well off to the internet I went and found what I was looking for. Now with some idea of what is required, off to the woods I went to find a suitable piece of wood. And so began quite a challenge, for me.

Attempt 1
Split a small log and penned out a rough outline. Started whittling and then disaster, wood twisted and unusable.

Attempt 2
Much the same as 1

Attempt 3
Actually got somewhere with this one, but made it far to thin and snapped.

Attempt 4
Looking good, but carving out the eye of the needle managed to split it in two

Attempt 5
Made it, didn't like it, burnt it

Attempt 6
This one almost finished me off and nearly took my finger. Managed to slice it to the bone, even today I still don't have all the feeling back in it. But carried on and finished and ended up with something that I thought would do the job. It was at this point, by a strange quirk of fate, my tormentor turned out to be quite local to me and a member of my local meet up. He kindly offered to show me how to use it.


Having had a fantastic tutorial on how to use it, it quickly became apparent that it wasn't quite the right proportions.

Attempt 7
Success is a word banned around these day with little meaning, but for me, this one was a winner. I've even started to make a net with it. But that will be another blog.


Honourable mentions

Kepis for the great lesson and the hellish challenge

Monkey Boy for setting up the whole thing